最近购入了一台 ThinkPad X1 Carbon Gen7,它使用的是 Intel 9560 AC 无线网卡,这种无线网卡是直接焊接于主板上的。Ubuntu 18.04 系统中没有开箱即用的驱动,因此需要编译一个驱动搞定这张网卡。
由于这台笔记本自带的有线网卡是 I219V 也无法直接驱动,因此建议使用外接的 USB 网卡。
内容
编译驱动
编译驱动需要安装最基本的编译工具链:
sudo apt-get install build-essential git
然后进行编译并安装:
sudo apt update
sudo apt install git build-essential
git clone https://git.kernel.org/pub/scm/linux/kernel/git/iwlwifi/backport-iwlwifi.git
cd backport-iwlwifi/
make defconfig-iwlwifi-public
sed -i 's/CPTCFG_IWLMVM_VENDOR_CMDS=y/# CPTCFG_IWLMVM_VENDOR_CMDS is not set/' .config
make -j$(nproc)
sudo make install
sudo modprobe iwlwifi
此时如果没有开启 secure boot,则无线网卡已经可以正常工作。
驱动签名
很多时候为了系统安全,我们需要开启 secure boot,那么如果此时执行 sudo modprobe iwlwifi 则可能会无法正常执行,你将会看到如下警告:
modprobe: ERROR: could not insert 'iwlwifi': Operation not permitted
由于 secure boot 开启时系统禁止加载所有无签名的驱动,因此需要对这些驱动进行签名。
首先,生成签名用的证书:
name="Kernel Modules Signing"
out_dir='/root/module-signing'
sudo mkdir ${out_dir}
sudo openssl \
    req \
    -new \
    -x509 \
    -newkey \
    rsa:2048 \
    -keyout ${out_dir}/MOK.priv \
    -outform DER \
    -out ${out_dir}/MOK.der \
    -days 36500 \
    -subj "/CN=${name}/"
sudo chmod 600 ${out_dir}/MOK*
MOK 是 Machine-Owner Key 的缩写,通过添加 MOK 可以实现与 OEM 以及系统厂商一样的对驱动签名管理的能力。我们需要通过 mokutil 工具添加新生成的密钥。此处会需要两次输入管理密码,随后会在 MOK 的管理界面用到该密码。
sudo mokutil --import /root/module-signing/MOK.der
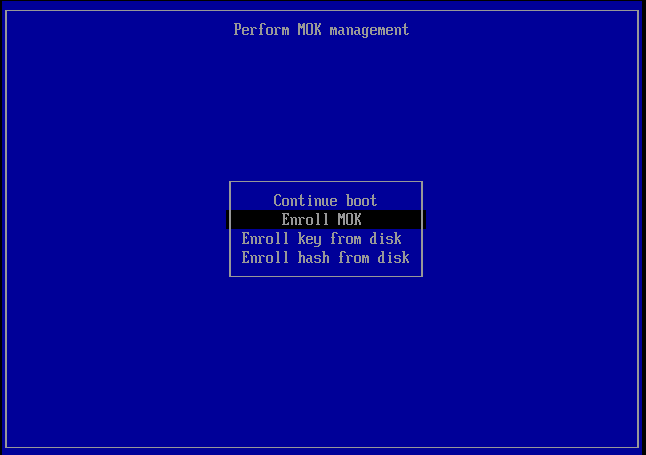
重启后系统会进入 MOK manager EFI utility。这是用来密钥的界面,按照下图所示添加新的密钥。
选择 Enroll MOK
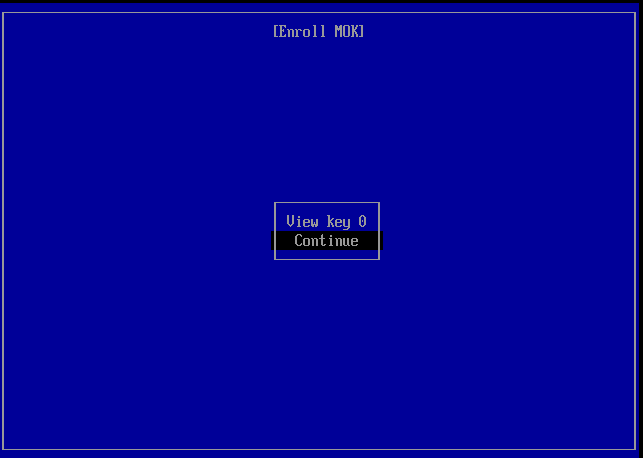
选择 Continue
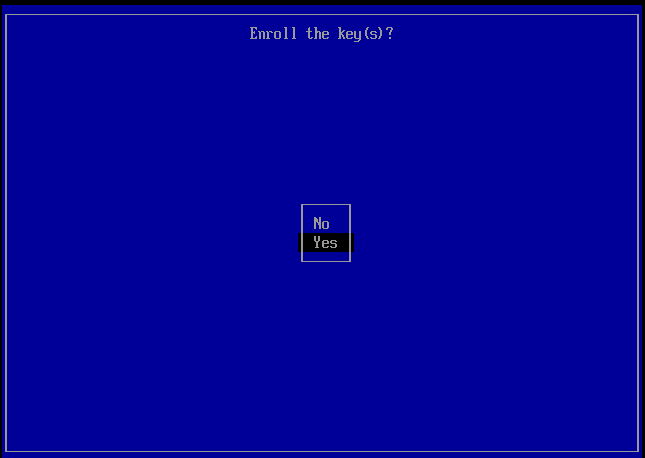
选择 Yes 添加密钥
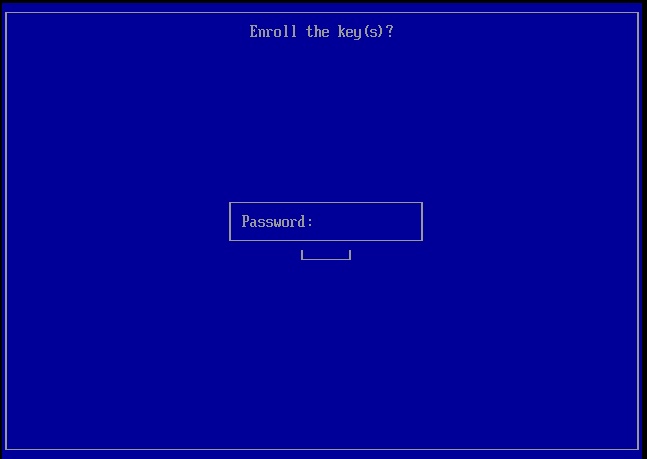
输入与前一步相同的密码
选择 Reboot 重启系统

你可以通过如下命令确认密钥的加入:
dmesg | grep '[U]EFI.*cert'
最后一步是对驱动签名,此处有如下的模块需要签名 iwlwifi, iwlmvm, compat, cfg80211, mac80211,因此需要执行如下命令:
cd /root/module-signing/

sudo /usr/src/linux-headers-$(uname -r)-generic/scripts/sign-file sha512 ./MOK.priv ./MOK.der $(modinfo -n iwlwifi)
sudo /usr/src/linux-headers-$(uname -r)-generic/scripts/sign-file sha512 ./MOK.priv ./MOK.der $(modinfo -n iwlmvm)
sudo /usr/src/linux-headers-$(uname -r)-generic/scripts/sign-file sha512 ./MOK.priv ./MOK.der $(modinfo -n compat)
sudo /usr/src/linux-headers-$(uname -r)-generic/scripts/sign-file sha512 ./MOK.priv ./MOK.der $(modinfo -n cfg80211)
sudo /usr/src/linux-headers-$(uname -r)-generic/scripts/sign-file sha512 ./MOK.priv ./MOK.der $(modinfo -n mac80211)
至此,驱动签名就已经完成了,你可以在开启 secure boot 的情况下使用 wifi。
参考资料
https://wiki.gentoo.org/wiki/Signed_kernel_module_support
https://wiki.debian.org/SecureBoot
https://askubuntu.com/questions/1196706/ubuntu-18-04-fail-to-load-intel-9560-wireless-firmware
https://gist.github.com/reillysiemens/ac6bea1e6c7684d62f544bd79b2182a4
2条评论. Leave new
sudo chmod 600 ${out_dir}/MOK* 这条命令执行不了 没有MOK*
这个问题应该是 OpenSSL 生成证书链没成功,需要检查一下